Monday, May 2, 2022

Wool jacket repair


I was asked if I could mend this double wool jacket. At first the owner only thought it was a few holes in the sleeves but discovered a bit more and didn't think I would be able to fix it.

However I said send it over and I'll see what I can do.

My first thought was to darn the holes, but the outer layer was very fragile and I would have ended up with damaging it even more.

So over to plan B

Finding a outgrown sweater from Jr Mayhem in the same kind of fabric, some Thermo fix, an adhesive with glue on both sides. I cut out patches to cover the biggest damage.

I made rectangular patches underneath the arm on both sides, then a couple of hearts for the front.

I wasn't sure what to do with the sleeve but eventually ended up with circles.

I really liked how the circle looked and very much regretted using the hearts in front and the rectangular ones under neat the arm.

Unfortunately I had already ironed the patches on to the jacket.


After all the patches was in place I started stitching around the edge of the patch. You can of course leave the patches with the raw edges, but I prefer to hand stitch. I used blanket stitch. You can see how it's done in this video 

https://www.instagram.com/reel/CafVdnvI-6w/?igshid=MDJmNzVkMjY=


Don't you like how the circles look? 


I also came up with a plan to add some circle theme to the rectangular patches.


You'll find more interesting mending stories and videos over at our Instagram account


Or Facebook if you prefer. 

https://www.facebook.com/Mendingmayhem

Feel free to join our Facebook group

https://www.facebook.com/groups/679685116007979/?ref=share_group_link

I'll keep on mending the jacket as the weather is perfect for indoors activities today.

I'm also going to attend the  Making Zen online retreat starting today.

It's possible to buy a all access pass and enjoy workshops from over 20 artists from all over the world.


'Everytime you purchase from my affiliate link you are supporting me and my artwork'. 

Have a lovely day 

Katrine 


Tuesday, April 26, 2022

Making zen online retreat


Last year when I had a Creators block I joined the #makingzen online retreat. It was such a great help and I got my creative flow back.

This year I have been asked by Kate Ward @zenstitching to be one of the speakers.


The retreat starts 2. May - 6.May

There will be presentations from more than 20 artists, including myself.

Making Zen is a online retreat for stitches and crafters to help them learn new processes, improve technique and get inspired through a wholistic approach that nurtures creativity.


All the presentations are for free for 24 hours.

You  can upgrade to lifetime access  that also will include great bonus materials. All for a very reasonable price.


You'll get your free ticket 🎫 and more information over at the Zen Stitching website.

Use the affiliated link to support your artist 

Making zen online retreat


Saturday, April 23, 2022

Sleeves and cuffs


I find it interesting to see how different people create holes in their clothes. Most of us keep getting holes in the same place. 

Probably because of how we wear our clothe and what we wear. Some holes lare related to our work or our habits.


I don’t know if you ever thought about it? 

As I was researching for this post I came to realise we had very few sleeves with holes, especially since Mr Mayhem isn’t driving so much., You know, he would lean on his elbows while he was driving. 

I more often get a hole at the heel of my socks, but Mr Mayhem seems to get holes at the toe. This is what I mean about how different people create holes in their clothes.


And at the moment we don’t seem to have any sleeves to repair.

So to show you examples and tutorials for mending sleeves, I had to ask people on Facebook for sleeves in need of repair. After this request,everyone here found lots of sleeves to repair at home too. Now I’ll probably be repairing sleeves for a long time. 


Often the sleeve or the cuffs on your sweater or shirt is the first place you’ll notice most wear and tear.

The cuffs often get holes at the edge. Often the rest of the sweater, jumper, shirt, blouse or cardigan will be fine.

So how do you fix the edges of cuffs?

There are several ways you can approach this mend, depending on your garment and what it’s made of.

A keen sewer would probably replace a rib knit cuff with a new one, but as a mender you might think about this a lot differently.

I have replaced a lot of cuffs on sweaters and sweatpants before. But not everyone has rib knit fabric at home. As a mender, you probably think of repairing a cuff before replacing it. 

So what can you do? Here are some examples you can consider.

Darn it

Patch it up with a piece of fabric.

I think we have covered darning pretty well in earlier blog posts before. But there are several darning techniques you can choose.

  • Duplicate stitch

  • Blanket stitch

  • Darning using crochet

  • Darning by weaving

Use festive colours to make it fun and visible or use colour similar to the fabric to make it more invisible.

A good tip is to insert a bottle inside the sleeve, using it as a darning mushroom. 

You can also use a small embroidery frame to set up your mending. 

If you have a knitted sweater or jacket, you can knit a new cuff by picking up the stitches under the damage and unpick the broken bit and knit a new one. Simple


For rib knits you can often see it’s splitting at first. You might get away with using blanket stitch just around the edge.  It’s even possible to add a missing piece by just blanket stitch back and forth so the edge looks smooth depending on where the fabric needs to be mended.

You can also use Zigzag stitches with your sewing machine to mend the cuff. 

There are so many ways to use blanket stitch. You can see different solutions in the blog 

https://themendingmayhem.blogspot.com/2021/07/blanket-stitch.html

I like to create new crochet lace onto the blanket stitch edge. Mr Mayhem isn’t that keen on having lace on his cuffs or sleeves though, and definitely not a style for the teenager either. 

If it’s more worn you might try to cover it with some similar fabric. Like from an old t-shirt. Remember rib knits are elastic and you need to get your arm into it after you are done so knit fabrics are a very good solution to mend these cuffs. 

You might prefer to use fold over elastic or maybe elastic lace. 

Of course it also depends if the worn bits goes all the way around or it’s just a little bit worn out in one spot. 

If it’s just a little bit you might get away with a patch out of sturdy fabric. 

Also the top of a sock will work well as a replacement for a broken rib knit. 

As an example wool underwear is expensive and is much more expensive than to replace a sock. Often the top of the sock will be fine even if the heel or toe has holes. 

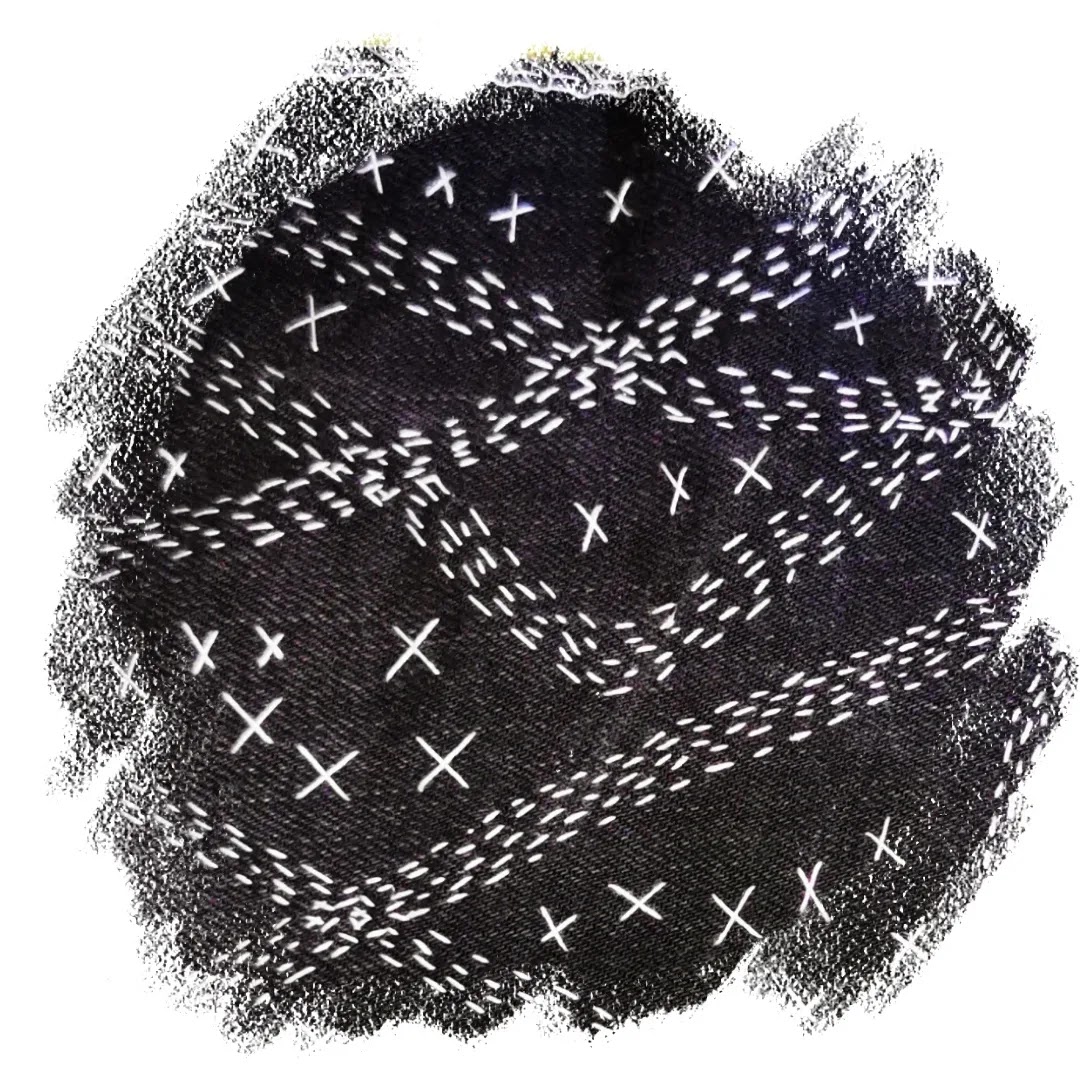
Small embroidery motifs are great ways to cover holes. Try using these to embellish your garments. You can even keep the hole by embroidery around it. It actually looks really cool.


Small doilies can work to mend clothes. 

Adding buttons or beads works fine for smaller holes and to cover stains on fabrics

For cuffs in sturdy fabric like shirts you don’t have to think about this because these are easier to patch or darn. 


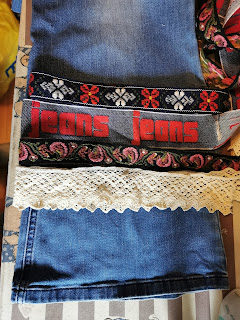
Several small patches in different colours creates a fabulous look. 


Choose hand stitching or use a sewing machine. 

I like the texture with hand stitching. But I’m some times lazy and have other chores to do so I use the sewing machine instead. 


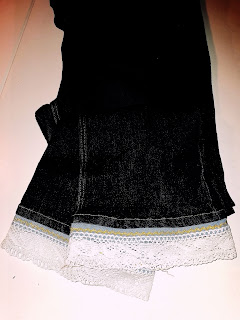
If it’s only the edges you can cover it with a strip of fabric or a bias binding. 


Embroidery, beads, buttons, darning, lace or doilies works fine with sturdy fabric as well. 

For sturdy fabric patches I use adhesive to keep the patch from fraying if it’s not folded in. 

I also use adhesive for kitted fabric patches. [not the rib knit] and an adhesive with glue on both sides if it’s to mend knit fabric. 

I often like to stitch around the patch even if I use adhesive so the edges do not fray

And I think it looks better. 


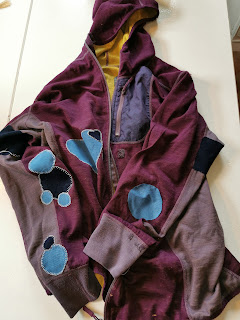
I think elbow patches are a very good alternative if it’s a large hole at the elbow. This is a classic style technique you’ll see in high fashion jackets and pullovers. Using elbow patches is decorative and rather easy to manage if you aren’t very experienced in mending. And darning a huge hole can be tricky so an elbow patch is a good mending solution. 

If it’s a knitted item you first need to make sure that you have secured all stitches so the stitches will stop unravelling more. 

I prefer to use a strong,  sturdy fabric for elbow patches like denim, corduroy etc. Leather works fine too but be aware that leather is harder to work with. Suede leather is a bit easier. You can also find suede leather patches with holes around the edge so these are easy to sew them on. 

It’s also possible to buy iron- on patches for elbows. 

I prefer to make my own as I have huge stash of donated jeans and other fabric. Then I can make them the exact size I need or want to use. 

I often use adhesive if it’s not folded in. It’s smart to cut notches into the edges of the fabric if you are folding it in especially with oval or round patches. So much easier to fold in nicely. 

Make sure your patches are positioned in the same place for both sleeves. 


For a knitted items knitted elbow patch or use crochet motifs. Both work fine on clothes that aren’t knitted as well. 

I found a free pattern for knitted elbow patches here https://www.purlsoho.com/create/2014/01/09/lauras-loop-knit-elbow-patches/


It’s also possible to just use a piece of fabric to patch your elbow hole. If you go for elbow patches you need to do both in my opinion.  But you can get away with a smaller patch on one sleeve. 

And there is nothing to say you need to make an  ordinary shaped patch. Why not make a star or a heart or anything else you can imagine. It just needs to be big enough to cover your hole 

You can also make any kind of embroidery on your patch to make it special. Or find a ready made embroidery from a table cloth or another garment. 

I think good stitches to use for adding elbow patches include 

Blanket stitch 

Whip stitch 

Back stitch 

If you know you get elbow holes. You might want to add elbow patches before you actually get a hole. 


You'll find reels over at Instagram
Demonstrating the different techniques 

Thanks for reading 
Katrine 


Wednesday, November 17, 2021

Creators block


I think most people have heard about authors having a writer’s block. Not being able to write anything new. 

I think this happens to all creative people now and then. 

Well at least it happens to me. It has happened before and probably will happen again. Hopefully not anytime soon  

Not being able to do anything creative, is a disaster for me. 

I always have several projects that I’m working on. It’s also helping me through bad days and chronic pain.  Having several projects on the go gives me joy. And this pretty much sums up who I am.  

But this Spring was very busy and much was going on. 

So I stopped posting landscape pictures on Instagram, because it took so much time and energy. 

Then I stopped taking pictures because it wasn’t fun when I couldn’t share. 

Didn’t think much about it at the time as I still was quite busy. And doing creative projects wasn’t my priority. 

I was going  to make garden figures out of wire and beads , something I usually like and enjoy creating very much. But it felt like an impossible task. It felt better to just do some dull cleaning or other things I usually try skip to work with my creative projects.  

So I managed to make 4 but it didn’t give me any joy. Last year I made over 20 garden figures. 

Spring came and went and I found I didn’t want to knit, or crochet or do any mending.  


When housework and painting houses etc sound more fun than doing what you loved it’s pretty serious don’t you think?


Still I didn’t think too much about it at the time. It has been a very good Summer perfect for outdoors activities. We aren’t really spoiled with this much nice Summer weather. So we hurried to get outdoor chores done, as we were thinking it’s not going to last. 

And we got so much done. But my joy for creativeness was totally gone. 

I had a lot of plans but never bothered to start. I would find things for the next project and then just leave them there. 

I only did very simple things, not really managing to keep my mind focused on anything creative.  

I had plenty of time to do some things but I would rather just play a silly game on my phone. 

Sounds a bit like a depression, right?. But this only infected my creative part of the brain. 

I put off everything thinking I would do it tomorrow, and tomorrow turned into the next tomorrow and so on because it all felt like an unwanted task. 

Even posting and writing on social media was really tricky. But I have obligations to the mending community and I felt really sad not being able to do a better job.  

After all it’s supposed to be the fun part of life.  

Feeling guilty for not being able to make anything productive and not managing to follow up with what I was supposed to do, didn’t really help.  


So I was fed up with not being able to create and just tried to force myself to do something. Well, I get all my socks darned and I did a few very easy projects that I wasn’t required to  think too much. But it still wasn’t fun.   


Making blog posts for Mendingmayhem and learning people to mend . Seemed impossible and I felt more and more guilty for not managing to get back on track. I didn’t know how to proceed.  


3 weeks ago I found some yarn I thought it might inspire me to knit a simple scarf. So I searched for patterns, but I didn’t find any I liked or had the energy to do. 


So the yarn sat untouched. 

I felt like a balloon with out air – very deflated.  


Not a creative bone left in my body. Except for the twig birds maybe it’s been the only project I actually had a good time with lately.  

I realised creativity can’t be forced. I already knew that, but I still felt I had to try and be creative.  

And everyone was telling me that I’m always creative. When really, my creativeness was as dry as sand from Sahara.  

Last week my sister came and she asked if I could fix her jeans. She has very long legs and rarely ever find jeans that are long enough for her body. 

So I said yes. And I was actually looking forward to it. For the first time in over 6 months I was really looking forward to doing something creative. Once I started working on my sisters jeans I also started working that yarn for the scarf I had left untouched. 

So hopefully my creative block is going away.  


And my creative energy will return along with the joy of creating.  

I’m writing this because I want you to know if it happens to you, you are not the only one.  Katrine. 

You can listen to it over at Seworganisedstylepodcast.com


Sunday, October 17, 2021

Diy wool insoles


Winter is coming and it's better to be prepared. Some wool insoles for your shoes will keep your feet warm. 

They are very easy to make yourself. 


 I used an old wool blanket.

If you don't have one you can often find them in thrift stores. It doesn't have to be pretty as they will be inside your shoes.

Or if you have a felted sweater it will work fine too.

You don't need a sewing machine, but it's much faster. 

A quick search on Google I saw wool insoles at a price range from 100 - 400 Norwegian kroner [ 12 - 47us$]  So you can easily save a few dollars if you make them yourself.


Cut 4 pieces from the wool blanket. 
I used another pair of insoles to draw a pattern. 


Putting 2 pieces together and sew them together around the edge. I used my serger, but a regular sewing machine work fine. Use Zigzag stitch around the edge. 
You can also hand stitch using blanket stitch. 


Then sew a few seams through both layers and you have a lovely pair of warm insoles for winter. 
If you don't want them to slide around in your shoes you can use an extra layer of non slippery fabric or add a few stripes of hot glue with a glue gun. 


Sunday, October 10, 2021

Adding length to jeans part 2


This method doesn't need any cutting in the jeans so even easier than the first one. 

You can actually just add a piece of lace or ribbon at the bottom of the jeans. 

Unfortunately all the lace I had that me and my sister thought looked good wasn't wide enough. 

So I cut two pieces of fabric 8cm high and as wide as the jeans legs and a little bit for seam allowance. 

Folding them double, then sewing them together making two pieces of 3.5cm 

You can use only a piece of fabric as well, but I think this looks better. 


Now I'm adding the lace to the bottom of this strip of fabric 


I wasn't thinking about adding anything else, but wasn't happy about how it looked. 

Remembered I had some cool gold Zigzag ribbon and decided to add it over the lace 


Then sewing them together in the side 


Now it's just to sew them to the bottom of the jeans 

I decided to hand stitch to make it invisible on the outside. 


I stitched in the top of the hem making sure it's not visible at the front. 


I'm quite happy with this pair as well. 


How to add extra length to a pair of jeans


My sister has very long legs and never seems to find well fitting jeans or trousers.

So when she got two pairs of jeans passed on to her, she asked me if I could help.


Of course I could, it even sounds like a lot of fun to me. 

I'll show you how to add length to jeans or trousers here. 


The first pair I added a extra piece of fabric into the leg. 

First I ironed the jeans as it is important that it's a clean cut. Then measured where to cut and how much. Marking it with a dissolveing fabric marker. 


Carefully cut off the bottom of the jeans 


Find some fabric similar to the jeans 
I have used fabric from another pair of jeans that were donated to me. 

If you have some that fit perfectly just cut out the entire piece. Mine didn't so I made 4 pices an sewed to and two together. 


Open up the side seams of the jeans you are adding length to. 
This will make it easier to add the extra fabric. You don't need to open it up all the way, just a little bit, both at the bottom and the top of where you cut the jeans 


Sew the new pieces to the jeans 


Trim off excess fabric so it will fit the legs 


Sew the cut off bottom of the leg to your added piece of fabric 


If you only want a piece of fabric, you can close the side seams and you are done. 
This works well for sweat pants and children's trousers. 
But I don't think it's particularly good for women who don't get long enough jeans. 
You want something that looks good right. 
So my plan was to hide it under some ribbons. 
Making some really fancy jeans for my little sister 

I tried different ribbons and lace until I found something I was satisfied with 


Pinning the first one in place, the rest I just put next to the other. 
Make sure you get the ribbon at the exact same place on the other leg and repeat the process 

When the ribbons are all in place, close the side seams and you are done 


Close up of the finished leg 


I think this one turned out pretty well 
My sister was very happy with them and think this definitely will be next years fashion 🤔 


Jeans are now about 7 cm longer 


And fitted my sister perfectly. 

Check out part 2 for how I altered the second pair 


Wool jacket repair

  I was asked if I could mend this double wool jacket. At first the owner only thought it was a few holes in the sleeves but discovered a bi...