Showing posts with label sustainablefashion. Show all posts

Sunday, October 17, 2021

Diy wool insoles


Winter is coming and it's better to be prepared. Some wool insoles for your shoes will keep your feet warm. 

They are very easy to make yourself. 


 I used an old wool blanket.

If you don't have one you can often find them in thrift stores. It doesn't have to be pretty as they will be inside your shoes.

Or if you have a felted sweater it will work fine too.

You don't need a sewing machine, but it's much faster. 

A quick search on Google I saw wool insoles at a price range from 100 - 400 Norwegian kroner [ 12 - 47us$]  So you can easily save a few dollars if you make them yourself.


Cut 4 pieces from the wool blanket. 
I used another pair of insoles to draw a pattern. 


Putting 2 pieces together and sew them together around the edge. I used my serger, but a regular sewing machine work fine. Use Zigzag stitch around the edge. 
You can also hand stitch using blanket stitch. 


Then sew a few seams through both layers and you have a lovely pair of warm insoles for winter. 
If you don't want them to slide around in your shoes you can use an extra layer of non slippery fabric or add a few stripes of hot glue with a glue gun. 


Sunday, October 10, 2021

Adding length to jeans part 2


This method doesn't need any cutting in the jeans so even easier than the first one. 

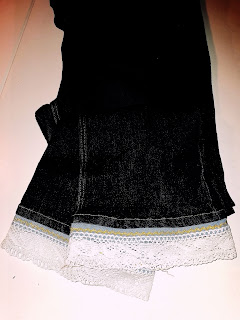
You can actually just add a piece of lace or ribbon at the bottom of the jeans. 

Unfortunately all the lace I had that me and my sister thought looked good wasn't wide enough. 

So I cut two pieces of fabric 8cm high and as wide as the jeans legs and a little bit for seam allowance. 

Folding them double, then sewing them together making two pieces of 3.5cm 

You can use only a piece of fabric as well, but I think this looks better. 


Now I'm adding the lace to the bottom of this strip of fabric 


I wasn't thinking about adding anything else, but wasn't happy about how it looked. 

Remembered I had some cool gold Zigzag ribbon and decided to add it over the lace 


Then sewing them together in the side 


Now it's just to sew them to the bottom of the jeans 

I decided to hand stitch to make it invisible on the outside. 


I stitched in the top of the hem making sure it's not visible at the front. 


I'm quite happy with this pair as well. 


How to add extra length to a pair of jeans


My sister has very long legs and never seems to find well fitting jeans or trousers.

So when she got two pairs of jeans passed on to her, she asked me if I could help.


Of course I could, it even sounds like a lot of fun to me. 

I'll show you how to add length to jeans or trousers here. 


The first pair I added a extra piece of fabric into the leg. 

First I ironed the jeans as it is important that it's a clean cut. Then measured where to cut and how much. Marking it with a dissolveing fabric marker. 


Carefully cut off the bottom of the jeans 


Find some fabric similar to the jeans 
I have used fabric from another pair of jeans that were donated to me. 

If you have some that fit perfectly just cut out the entire piece. Mine didn't so I made 4 pices an sewed to and two together. 


Open up the side seams of the jeans you are adding length to. 
This will make it easier to add the extra fabric. You don't need to open it up all the way, just a little bit, both at the bottom and the top of where you cut the jeans 


Sew the new pieces to the jeans 


Trim off excess fabric so it will fit the legs 


Sew the cut off bottom of the leg to your added piece of fabric 


If you only want a piece of fabric, you can close the side seams and you are done. 
This works well for sweat pants and children's trousers. 
But I don't think it's particularly good for women who don't get long enough jeans. 
You want something that looks good right. 
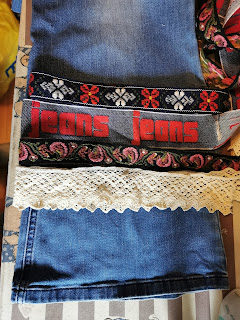
So my plan was to hide it under some ribbons. 
Making some really fancy jeans for my little sister 

I tried different ribbons and lace until I found something I was satisfied with 


Pinning the first one in place, the rest I just put next to the other. 
Make sure you get the ribbon at the exact same place on the other leg and repeat the process 

When the ribbons are all in place, close the side seams and you are done 


Close up of the finished leg 


I think this one turned out pretty well 
My sister was very happy with them and think this definitely will be next years fashion 🤔 


Jeans are now about 7 cm longer 


And fitted my sister perfectly. 

Check out part 2 for how I altered the second pair 


Tuesday, August 3, 2021

Too small jeans or trousers


It's so annoying to take out your favorite pair of jeans and discover they have been shrinking in the wardrobe 

Don't worry it can be solved. By adding a little bit of fabric in both sides. 

I'll show you how. 


Start by cutting the side seams open as fare as you need to make your jeans fit. 

Try to avoid pesky nails if you can't you need to take them out using pliers. 


I cut to the front pocket. Unpick a little bit of the lining and the side seam. The one you just cut open. 


Find the fabric you want to use. It's better to use something similar to the one in your trousers. I had some denim in my stash in quite similar colours so I went for it. 


Put your opend seam on top of the fabric to measure the kind of piece you need. 

Use a fabric marker or chak to mark the area 


Cut out your pieces you will need two one for each side of your jeans. 

REMEMBER TO CUT WITH SEEM ALLOWANCE. And access to fold back down at the lining. 


Pin your triangles in place where you cut your seam and sew it in place. 


Remember to sew over the original seam as you don't want it to rip. And to fold out the lining so you can sew all the way to the back side of the lining as well. 


It can be a little bit tricky to sew the triangle by machine, but I prefer to use my machine. You can of course use hand stitching if you like to or don't have a sewing machine. 


Now your pices should look like this.
Repeat on the other side. 

Then top stitch the lining and your triangles and make sure you get all the way to the original seams. 

And you should be able to wear your favorite pair of jeans again. 


Mine had a couple of extra needs. 
I discovered holes next to the back pockets. I fixed it using a under patch and just darning it with the machine 


Hope you enjoy wearing your favorite pair of jeans again. 


Sunday, July 25, 2021

Dorset buttons


                    DORSET BUTTON 


the Dorset button are made using a ring and for example pearl cotton embroidery thread. I often use a thin crochet thread as well. 

You can use different kind of rings wood, metal or plastic. Metal rings must be rust free. Rust free washers works fine. You can even use curtain rings to create larger buttons. 

You need to know Blanket stitch and Back stitch in order to make this button. 

There are a lot of different patterns f


or Dorset buttons but today we are covering the most common one the Dorset Cartwheel Button.

I used a plastic ring this time as I had a few at hand. 

Secure the thread by making a knot, I use to put the tail under the blanket stitches after. 

Blanket stitch around the hole ring 


Make sure you are making the stitches tight together so there is no gap between the stitches. 

Turn the ridge off the blanket stitches into the middle of the ring 


Now it's time to make the spokes wrapp the thread around the ring until you have 8 [my ring is tiny so I used 8 but you can add more if you want to] threads all crossing in the middle. 


Secure the middle cross with a x stitch. [both the top and bottom threads] 


Now you should start weaving around the strands of threads doing back stitch 


Keep going with blanket stitch until you have filled it all the way. Secure ends on the back 


You can use the Dorset button as any other button and they also makes great jewellery 
I made earrings out of mine 
Just created a hoop for the earring piece on the back 


Next time I want to try Yorkshire buttons 

I found a great pdf download over at this Blog


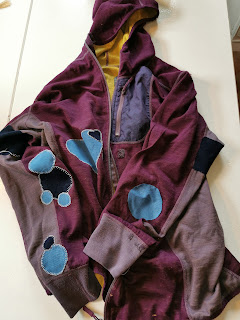
Wool jacket repair

  I was asked if I could mend this double wool jacket. At first the owner only thought it was a few holes in the sleeves but discovered a bi...